12 March 2021

Procedural Chunk-Based Universe Part 7: The Police, no wait I mean Eiffel 65, wait no not that one either...

My 3D chunk system, about which I have written before but honestly feel I should have covered in more detail by now, has a new feature.

As is surely obvious, the system creates and manages a population of box-shaped "chunks" that form a grid in one, two, or three dimensions as desired and can generate and store components of levels or environments, not unlike the chunks famously used by Minecraft for storing blocks and entities. Minecraft incidentally has another feature of particular relevance here, which is that when chunks generate terrain or features such as trees or villages, they are able to communicate with neighboring chunks about what they have generated. Thus it can be assured (if everything is working properly) that terrain will vary smoothly rather than abruptly changing at chunk borders, and if a feature such as a tree extends outside the boundary of one chunk into another, it can be assured that the blocks comprising it will be appropriately stored in the neighboring chunk rather than being abruptly cut off. It is easy to imagine myriad ways in which such coordination between chunks and their neighbors could be important.

A while back, as I was implementing the beginnings of this sort of communication in my own project, I created an experiment in which chunks behaved as cellular automata and recreated Conway's Game of Life:

As progress on the project continued, I foresaw that there would specifically have to be a way to ensure that travel was possible between chunks and their neighbors without having to leap a vast chasm or move through a wall. Whether the final use case be a labyrinthine parking garage such as in Find Your Car where doorways and ramps are needed, a sprawling cityscape where roads and bridges will have to connect, or a winding dungeon or cave system in which hallways or tunnels will have to lead somewhere, the concept of connecting points between adjacent chunks will be seminal. For convenience's sake I've been using the umbrella term "doors" for all of these despite some of them being a far cry from an actual door.

After establishing basic communication between chunks, I put together a few more experiments with different configurations of these doors. In the first draft, they were only generated at the centers of the chunk boundaries, forming a very obvious grid, but in short order I made it possible to generate doors with randomized offsets.

I actually spent a long time puzzling over how best to tackle potential problems with this concept - if a chunk generated a door leading outward into another chunk, wouldn't the second chunk have to then check on whether parts of it need to be regenerated (such as a wall blocking said door)? If so, wouldn't all doors have to be generated before things such as walls can be generated? But then, what if a chunk made a door and then another chunk tried to make a door that overlapped it - which chunk's door gets to stay? And what if a chunk generates a door leading into empty space (far from the player) and then another chunk generates later on and wants to put a wall or another door there?

To date my best solution has been to introduce a little bit of redundancy in exchange for making sure adjacent chunks always agree on where doors should exist: each "door" between two chunks is actually a pair of doors, each generated by and belonging to one of the two but existing in the same place. Later on when level geometry is being built, chunks can check for whether a door object exists at that position and forego spawning it accordingly.

All of this is pretty old news on my end, though. As I tend to do, I got this far and then did something else for a while. In retrospect I ought to have covered it on this blog earlier, but the reason I write this entry now is the new breakthrough I had in door positioning.

Before, even if doors were given random offsets, because they always existed on chunks' faces, the underlying grid structure remained visible, especially if I tried spawning a whole bunch of doors for each chunk. In many games this is acceptable or even desirable, but a priority of mine since the beginning was being able to completely eliminate the grid from the players' view. For instance, to reference Minecraft again, even though the world is made up of blocks, players don't see the world broken up into big square sections according to the chunk borders. Coastlines curve and hills roll in their blocky ways completely independent of those borders.

Recently though, as I was casually thinking about the project, it occurred to me that there is no real need for doors to actually exist on the chunks' faces. Despite being generated according to a given face, the actual spatial location of the door could be offset in its "depth" as well as within the plane of the face. Of course when I began to experiment with this idea, I immediately discovered a small issue: with this offset, the volumes in which doors could generate formed boxes of their own, and these would overlap. This might be a non-issue, but I had a bad feeling about it and still consider it undesirable at present. Fortunately, I realized that a cube (which is the basic shape of all chunks, though it may be distorted) is equivalent to six square pyramids that all "point" to the cube's center. This is easily illustrated by what happens when all of the cube's eight vertices are connected to the center:

Since any given face represents the interface of two chunks, it accordingly forms the shared base of two square (or rectangular) pyramids that together form an octahedron. Interestingly, this is not a regular octahedron, i.e. the familiar shape of the eight-sided dice popular in the tabletop roleplaying community or the approximate shape of a typical uncut diamond. This is significant because regular octahedra cannot fill a 3D space without either overlapping or leaving gaps, but the slightly oblate octahedra formed from slicing cubes can fill a 3D space, forming a mathematical object known by the very cool sounding name "Hexakis Cubic Honeycomb" or "Pyramidille" as coined by the aforementioned Conway:

The structure may be a bit difficult to see in this diagram but at least it looks cool. Click for the Wikipedia article explaining the concept in more detail.

By generating randomized points within a cube and then transforming them with a bit of vector math, I was able to produce sets of randomized points within these octahedra, which not only made for a few neat screenshots but allowed me to generate doors anywhere in 3D space without the generation volume belonging to any chunk face overlapping that of any other chunk face, which should help in avoiding potential problems such as paths leading to doors intersecting with paths leading to other doors when they shouldn't:

At this point the time felt right to make another demo, so for lack of any reason not to do so, I substituted trees and clouds for doors and used the newly revised system to generate a procedural forest. I had included the ability to constrain door offsets arbitrarily (as seen at right in the image above) and to spawn different types of doors for horizontal and vertical boundaries (e.g. to spawn staircases to serve as "doors" between a floor and those above and below), and I made use of these features to keep trees on the ground and spawn clouds as "vertical doors" in the sky:

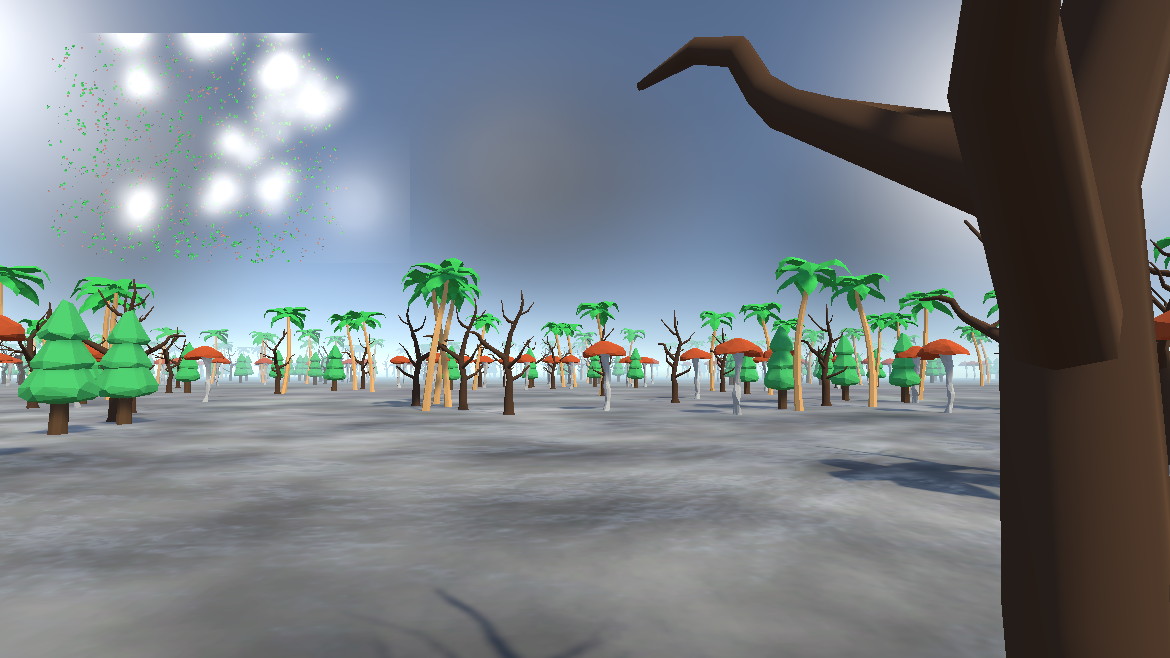
Perhaps now the jokes at the beginning of this article make sense. The minimap at top left shows how, despite being originally generated based on a grid, the final "door" positions appear completely random and organic. This demo is available to play on my itch.io page.

04 February 2021

Procedural Chunk-Based Universe Part 6: Going in Circles

Yes, it's been two and a half months since my last update. I suddenly got weirdly busy again.

Anyway, in my earlier entry "I Just Accidentally a Roguelike" I discussed a system I had concocted for assembling levels (or really any structure) from premade parts with attachment nodes. I mostly rambled on and on about the ComputePenetration function exposed in Unity's PhysX implementation and didn't illustrate the actual level generation process very clearly. To rectify that before I continue with new information, here's an image of a level the system generates:

This level is in the process of being generated. In the center is the starting room, which I placed manually. Branching off of it are randomly selected other pieces - in this case, simply small square rooms and straight hallways.

Observe how near the top right is a room with its attachment nodes visible. There are actually four here, though one is obscured. This and the other two green nodes are unoccupied and can accept new pieces, while the orange node is occupied by the hallway running toward the lower left. The hallway is not selected and thus its own attachment nodes are hidden, but they too are occupied, one by the selected room and the other by the second segment of hallway that in turn connects to the starting room. Every room and hallway in the level has its own set of attachment nodes in similar situations.

The level generator runs in iterations, during each of which it pulls from the set of all existing nodes, ignores those that are already occupied (This is not an optimal approach and I don't recommend copying it! This was an experiment.) and then performs roughly the same process as this one beautifully illustrated by Lived 3D:

My version naturally has a few differences; for instance as I detailed before, I use a more precise collision detection technique, but on the other hand my system doesn't currently have the ability to automatically prune rooms in the event that it cannot add an end cap. For now this latter issue is easily accommodated by simply having a small "wall" piece that fits within the doorway of any room and can safely be inserted without risk of overlapping another room.

Both my and Lived 3D's systems work fairly well for levels of a limited size, but since I first made mine (two years ago already, wow) I've become aware of a major limitation they have.

In very basic mathematical terms, the structure usually described as a "level" in a game boils down to something called a graph.

No, not that kind of graph. I mean the type studied by mathematicians in the field of Graph Theory. In short, a graph is a data structure that follows these three rules:

  • Some number of vertices exist; a vertex is the intersection of some number of edges. This can be zero edges, and the number of vertices in the graph can be zero as well.
  • Some number of edges exist; an edge is usually a connection between two vertices, though in certain types of graph an edge can connect a vertex to itself or form a ray extending infinitely.
  • Edges can only exist where they are connected to vertices: no edge can exist "alone."

In technical terms, edges and vertices, while generally visualized as dots and lines in 2D or 3D space, do not need to exist in any type of space at all, and the positions at which vertices are drawn is immaterial. In level design, the physical space and the vertices' and edges' places in it tend to be very important, but for the moment I'm bringing up this topic because of a very important concept in graph theory - that of a tree. No, not that kind of tree. Observe these two graphs:

-

The first graph is called a "tree" because any vertex within it can be called the "trunk" or "root" and all of the edges connected to it "branches." In theoretical terms, the defining feature of a tree is that it does not contain any cycles, i.e. regions within the graph where it is possible to begin at a vertex, follow a path of connected edges, and return via that path to the starting vertex. Real trees tend not to grow branches in loops back into the trunk, after all. Note how in the second graph, two closed loops exist where one can create a path from one vertex back to that same vertex.

In level design, if one imagines rooms as vertices and doorways (or portals, or bridges, or whatever) between them as edges, pretty much any game level forms a graph and very often these graphs contain cycles. One game in which this is made very obvious is The Talos Principle:

The goal of this level is to solve a puzzle and thereby gain access to the area pictured and the T-shaped gold block therein. Once the player walks onto it and collects it, the fence at the right falls down, allowing the player to return to the beginning of the puzzle and leave through the front door instead of having to backtrack the whole way. This layout is necessary due to a design choice by the developers to have the puzzles be accessed in a non-linear fashion and all connect to a central hub. The underlying graph structure is also easily visible in many games via an overhead view of the level layout, as illustrated on Jared Mitchell's blog in regard to the game Amnesia: The Dark Descent:

Many level design tutorials exist that refer to graphs and cycles in this manner, and there are strong arguments for why this is a major boon for many games.

The system I made, however, can only generate trees. Once rooms are added, it only checks to see if more rooms can be attached onto their attachment nodes, and it has no way to examine their spatial relationship to other rooms' attachment nodes to see if it's possible to connect a new part of the level to an older part and thereby form a cycle. Much of the time, this isn't even possible because the doorways of these rooms won't line up with those on existing rooms. Alignment can be assured, or at least made much easier, by restricting level generation to a grid, as many games do very successfully, but I'm interested in exploring ways to keep the level free from grids wherever possible, meaning that the positions (and orientations) of attachment nodes can be highly variable and will almost never align perfectly by chance. Examining the first image in this post, for instance, reveals hallways that end in walls or converge in a way that seems like they could connect, except that there is no connector piece available that would fit in that space and complete the connection.

Therefore, in order to achieve this functionality, I've set out to engineer ways to make level pieces more flexible so that they can move their own doorways (and attachment nodes) to align with those of other pieces. I plan to go into more detail on the strategies I've begun to explore in a future entry.

19 November 2020

ShipBasher Development Log 15: Chad Space Elevator


Silly and critical memes aside, I took a break from writing code and mucking about in the Unity Editor to play around with some models and textures. ShipBasher is going to need modules that look they belong on epic sci-fi and fantasy spaceships like what we're used to seeing in Star Wars, Star Trek, The Expanse, and other popular franchises that feature spaceship combat. What it currently has is not that, and sadly I've failed to find any asset packs that really feel right in this respect so I don't even have the option to just buy some instead of making them unless I want to compromise on the final look.

I started blocking out a new generation of basic pieces in Blender such as fuel tanks, rocket engine nozzles, and the all-important crew habitation ring. While the majority of fictional spaceships opt for magical gravity of some kind (even The Expanse uses unrealistically efficient torch ship designs to pull it off), I would enjoy it if in some small way this game could help show the world how sci-fi can remain exciting while being a little more realistic in this department. Movies such as 2001: A Space Odyssey, Passengers, and The Martian helped, but none pushed very far into the gratuitous epic spaceship battle genre and that's where I want to contribute. Thus at least for now I mean to include things such as habitation centrifuges.

It's probably already familiar to most people who would be reading this and it's a simple concept at first: put the crew in a big hoop that slowly rotates around its axis, and the centrifugal force will be equivalent to gravity, helping them stay healthy on prolonged space missions:

In this screenshot from Nier: Automata, the space station known as the Bunker has a large ring that rotates. As 2B stands on the outer surface of this ring (i.e. floor), she perceives centrifugal force pushing her toward it, which feels the same as gravity pulling her downward and has the same physical effects.

When I started coming up with ideas, I discovered I had a problem to solve: there would occasionally be a need for someone to move between the artificial gravity ring and the rest of the ship (for example to access the engines to perform maintenance), and there were constraints on how this could be done:

  • I don't want people to have to exit the ship, whether in a dinghy or in an EVA suit, in order to get between sections. Ideally the elevator transferring them will remain inside the ship's hull at all times so that it needn't worry about repeatedly docking or dealing with radiation or debris from outside.
  • The whole ship shouldn't be required to rotate, as this would pose unnecessary difficulties for docking, tracking targets, and staying structurally sound: on a rotating object, centrifugal force is greater for parts further from the center, so anything that extends too far out will be under a lot of constant mechanical stress, meaning the ship will have to be bulky to avoid breaking apart.
  • The ring has to be able to "stack;" it should be possible to construct a ship with two or more rings in sequence, meaning there has to be a stationary attachment point on both ends of the ring's central column.
  • The rest of the ship must be able to connect to form a solid piece. If the elevator shaft rotates, and the elevator passes through the hull of the central column, then as it rotates it will sweep out a disc that completely separates the front and back portions of the ship.
  • Ideally this will be accomplished with a minimum number of moving parts and airtight seals, and any seals should be as small as possible to minimize friction and leakage.
  • The elevator has to be able to stop and wait at either end for any amount of time (in case someone is slow or has a lot of cargo to move), so junctions shaped like arcs in which the elevator can only spend a portion of a full rotation are not viable.

Based on these "rules" I eventually came up with this design:

  1. The passenger can enter the elevator (red) in the central column, where there is no rotation and thus no artificial gravity. The elevator is stationary at this point.
  2. The elevator passes through a stationary opening (not visible) connecting the central column to the inside of the bearing (yellow). Once inside the bearing, the elevator begins to move sideways and follow the circumference of the bearing, thus beginning to impose artificial gravity on the passenger.
  3. Once the elevator has matched its speed and position to the shaft (green), it enters the shaft and moves toward the outer ring. The bearing, shaft, and outer ring rotate together as a single connected unit, so the elevator does not need to perform any special alignment and instead behaves much like a familiar elevator on Earth from this point.
  4. The passenger exits the elevator into the outer ring and experiences artificial gravity. In order to move to the central shaft, the elevator can simply repeat this process in reverse.

Hopefully that wasn't too hard to follow. I could perhaps make a video about it later to make things clearer. This is the best design I've managed to conceive so far, fulfilling all of the constraints I identified. The only drawbacks are that it requires a large movable airtight seal between the inner surface of the bearing and the outer surface of the central column at the point where they meet, and the elevator has to be able to move in multiple directions and thus disengage and re-engage with multiple tracks as it travels. On the plus side, all of the elevator's movement occurs inside a pressurized space, so in the event of a breakdown it should be relatively easy to access and repair; and the elevator does not need to be able to park and wait while traveling through the bearing, so some of the space inside the bearing can be used to house motors (to maintain and control the ring's rotation) and other hardware.

While working this problem I tried to look for existing solutions and research on the topic, but alas, submitting the terms "space" and "elevator" in a query to a major search engine today causes a flood of results about the popular concept of a Space Elevator used for transit between Earth's surface and orbit, which while exciting, was not useful for this problem. One relatively helpful page I encountered was the extensive article on artificial gravity at Project Rho's Atomic Rockets website, but even this had little to say about the mechanics of transit in and out of the rotating sections of ships (or stations). If anyone has thoughts, or knows of existing research on this topic, please share it because I surely can't be the only one to be considering it and I'm eager to hear what other approaches have been explored.

17 October 2020

ShipBasher Development Log 14: The GPU Bullet Collision Saga, Episode 4: Conclusion...?

Having solved The Big Problem®, I was afforded no respite before having another problem to address. I noticed along the way that the testing code I had added to draw debug lines for all of the bullets that had entered bounding spheres was displaying a different set of bullets than the bullet rendering script was displaying. When I sucked up the performance impact and had the rendering script draw debug lines for every bullet in existence, I found something worrisome: all of the visible bullets were in fact behaving as they should and appearing in their correct locations, but a fair chunk of the bullets that had been fired were invisible!

I temporarily disabled stretching for the bullet sprites and made them really big so it was obvious which were being displayed properly and which only via debug lines (tiny blue dots).

At first I figured that some conditional statement or other was hiding bullets, so one by one I tried disabling all such checks. I even made the system draw red debug lines for inactive bullets. I had no luck.
Then I figured maybe something was up with the collision system. Fortunately that already has a simple Off switch, but it turned out that wasn't it either.
It did turn out that, while I didn't bother counting them myself and don't expect anyone else to do so, that exactly 2/3 of the bullets were invisible.
One may notice that 3 is the exact number of vertices in a triangle! HALF LIFE 3 CONFIRMED

Just kidding. The real reason this is relevant is because I was calling the sparsely undocumented function Graphics.DrawProcedural(). Because my geometry shader outputs triangles, I figured that when it asks for the MeshTopology argument, I should say to use triangles. Nope! Somehow that was causing the shader to be informed that two out of every three vertices were part of a triangle belonging to the first vertex and should be skipped by the geometry shader. Odd. Changing the MeshTopology argument to specify points (individual vertices) fixed it.

So yeah the moral of the story is that if you're drawing a point cloud using Graphics.DrawProcedural, use MeshTopology.Points. Hooray! Now my system draws three times as many bullets with one simple change in code and no significant change in performance! Here's how the system looked after all the recent improvements:

The captions in the image should be fairly self-explanatory. I can stretch the bullets based on their absolute world-space velocities or their velocities relative to the camera or some other object, I can spawn particle effects at their precise points of impact, and when the bullets ricochet they finally do so based on proper reflection vectors and I can specify how much of their original velocity to maintain and how much to randomly scatter. There is a tiny amount of imperfection in the impact positions still, but I feel that I've refined it as much as I need for the time being.

Here's another comparison, this time showing all of the iterations thus far:

Observe how, as the camera moves in order to maintain its position relative to the target ship, the purple bullets stretched according to their absolute world-space velocities appear to stretch in the wrong direction, whereas the cyan bullets appear much more correct. It's not shown above, but I can also have the cyan bullets maintain some portion of their forward velocities and penetrate into the target rather than bounce. This could be useful on some kind of powerful railgun that can punch through armor plates to damage modules inside a ship.

Also note that I finally fully implemented the option to have bullets become inactive upon striking a module, as I expect will be the case for most bullets in the final game. And look! I even got bullet damage working:

With all these kinks worked out, my next task was optimization. When I originally cooked it up, even with all its flaws, the GPU Bullet System could handle over 100,000 bullets on screen at once before any noticeable performance drop. At this point? Not so much.

The bulk of the problem is that the GPU can easily draw tons of identical sprites, but communication between the GPU and CPU is relatively slow, even on an integrated graphics chip. While the actual GPU and CPU are intimately connected, literally sharing a casing, in this architecture (if I'm not mistaken) the GPU stores its data in the same place the CPU does - the RAM. Thus, every time a buffer needs to travel between one memory region and the other, I lose several cycles of processing waiting for the data to be accessed from the RAM. Since each different type of bullet needs its own set of compute buffers, and at least one of these has to travel one way or the other up to four times per frame, having many different kinds of bullets in play at a time (as I do currently) leads to a significantly lower framerate.

Currently I'm investigating a few remedies to this.
By doing some optimization work in the code to reduce unnecessary operations and eliminate garbage generation wherever possible, I've sped it up by a noteworthy factor, but I still have several milliseconds' delay every frame while the CPU waits on data from the GPU. I've experimented with making this subsystem asynchronous, but that enables the data to arrive in an entirely different frame from the one during which I requested it and thus I have to deal with discrepancies in where the bullets are in the buffer I've received versus the main buffer, which in turn leads to grossly inaccurate results from physics queries and, once again, to my frustration, bullets floating through the target ship without touching it.
Next I think I'll investigate the possibility of only having one bullet manager script for the whole game and having each bullet within the buffer carry a bunch of extra data about what sort of bullet it is. Depending on how far I go with this, it could get very, very complicated.
There's also still the option of keeping it as-is. I'm open to suggestions on this.

Finally I leave you with a picture of what happens when I dispense with concerns about framerate entirely and make the system display ONE MILLION BULLETS!

There's no starfield background here - every single little white dot in the image is a bullet that the system is processing and rendering. The framerate is less than stellar in this situation but still surprisingly high, and I surmise that a more powerful GPU than mine would handle it easily.

13 October 2020

ShipBasher Development Log 13: The GPU Bullet Collision Saga, Episode 3: for(int i = r; i < r % z + r; i += r - z > i ? 1 : z % (r + z)){ z -= r; r += i; r = r % z + i > 0 ? i : r - z % r + z; z -= r; }

That "code" in the title isn't what's actually in the game (in fact I doubt it'd even compile, let alone do anything useful), but it is a caricature of how my code was starting to look to me at one point during the long debugging process I mentioned undertaking at the end of the last post.

See, I had also upgraded the compute shader one more time with a fourth compute buffer - this one representing bullets that the physics engine had confirmed actually did hit a ship. As of now I'm still just having them bounce off, but pretty soon I'm going to want them to stop existing, or in more precise terms as far as my code is concerned, become inactive so they stop being displayed and hitting things. Maybe sometimes I'll want bullets to survive and have secondary impacts (or penetrate through modules) but the option to deactivate bullets that have impacted is important. This buffer gets filled up on the CPU end of things, and then at the end of each frame, after the collisions have all been addressed, it gets sent to the GPU containing copies of all these bullets, notably including their indices in the original buffer so that the compute shader knows which of the original bullets have now become inactive.

Here, I'll recap with a flowchart that might help or might just make this all even more confusing:


Rounded rectangles represent the game systems related to GPU bullets; ellipses are tasks the systems can do, and the clouds surround the tasks belonging to a given system. The parallelograms represent the four compute buffers, and the arrows represent how each system affects each buffer or other system.

As shown here, the persistent data for the bullets is stored in the GPU's memory, rather than the CPU's as is the case for most of the game's data. Note how in order for the game to function, communication must occur back and forth between the CPU and GPU.

Because GPU code doesn't deal in pointers the way CPU code does, any time a data structure has to travel between one and the other, the data itself gets sent as a copy. Thus when, for example, the compute shader adds a bullet that has entered a bounding sphere, the bullet in the main buffer remains where it is, unchanged, while the new buffer entry is a copy of that bullet's data. In order to keep track of which data belongs to which bullet, I simply include an ID in that data. The first bullet that ever gets fired is given ID number 0, then the next 1, and so on up to the maximum number of bullets I allow in the game configuration, e.g. if I allow 10000 bullets then the last one is number 9999. After that, if I fire a "new" bullet, what actually happens is I overwrite bullet 0, which is bound to have either hit something or drifted off into deep space by this point. This is a common programming concept called a ring buffer or circular buffer, which is a type of object pool.

When a bullet enters a bounding sphere and a copy is added to the corresponding buffer and in turn sent to the CPU and the physics engine, unlike the bullets in the main buffer, that copy only exists for that frame. It's a trivial task for the GPU to regenerate it as it iterates through every bullet every frame anyway, so this has insignificant performance impact. In order for anything to happen, the physics engine must give a positive result when the bullet is evaluated that frame; otherwise it goes away when the buffer gets reset and thus nothing happens to the main buffer.

If a collision is detected, then that bullet's data is copied once again, this time into the buffer representing bullets that have hit something and must either be redirected or deactivated. Each type of bullet is handled by a corresponding instance of the bullet manager script and its own associated set of compute buffers, and for each type of bullet I can configure whether to allow ricochets or delete bullets after impact; based on which option applies, the data copied into the "impactor" buffer can contain a modified velocity or a flag indicating that it represents a bullet that should be deactivated. All bullets that have struck something are added to this buffer and then the buffer is read by the compute shader.

Because each bullet's complete data is copied every time, not only is its important position and velocity perserved, but also its original ID from when it was fired. Thus when the compute shader receives all the impacted bullets, it can match their IDs with the corresponding IDs in the main buffer and change those bullets accordingly, altering their velocities or deactivating them. In the end, bullets and the things that have happened to them persist frame after frame as long as they are needed.

I'm almost to the point where I explain the big problem I faced. There's just one more thing to explain. To prevent this becoming too much of a textbook page, here's another picture:

Another screenshot of my debugging process. The yellow specks are the debug lines for bullets that have bounced off the target ship and now entered the test ship's bounding sphere, which I temporarily made larger. You may notice something suspicious going on here that I'll address in the next entry.

Back on topic, I mentioned above that I assigned an ID to each bullet as it was fired. Unfortunately it's not quite as simple as slapping on a number during the firing function. If I were to individually update members of the compute buffer as bullets were fired, it would cause lots of little data packets to have to be sent to the GPU  - possibly lots every frame if the overall firing rate is high, as is the case with a rapid-fire gun or a large number of guns firing at once. Due to the way computers are designed, this would cause soul-crushing lag. Rather, the optimal way to go about his would be to gather up all the bullets that have been fired in a given frame in a nice little array and then at the end of the frame send one packet containing that array to the GPU - so that's what I did. Thus the firing function didn't count up numbers in the buffer itself, but rather the number of bullets that had been fired that frame. I called this number R.

What this means of course is that when I send the array of new bullets, I also need to tell the compute shader where to start changing bullets in its compute buffer, so I added a second counter value, which I called Z. Every time a bullet was fired, I would add one to R and to Z. At the end of every frame, once all the new bullets were ready to submit, R would reset to zero, but Z would remain as-is, tracking how many bullets had been fired ever, or at least since the last time I had made a full loop of the ring buffer. By doing math (see title) with R and Z, I could discern where in the compute buffer to start making changes and how many entries to update, and I could even check whether I had run past the end of the compute buffer and needed to go back to the beginning. Soon after I had implemented this, I had bullets happily whizzing out of the gun barrels frame after frame with no invalid array index exceptions or whatever, and I washed my hands of this and shifted gears to things like the collision detection that's been the focus of the last few devlogs.

But then I noticed something very, very strange. At high rates of fire, everything seemed perfect, but if I happened on a whim to switch to a low rate of fire, only a few bullets per second... bullets would float through ships unimpeded for a short time and then bounce off empty space as if it were the ship!

What's going on here?!? There aren't a lot of bullets visible so I drew some arrows to make it clearer - the bullets (blue crosses) are traveling up from bottom right, passing through the target ship, and then bouncing near the top and going off to bottom left even though there isn't anything at the top! No, there were no invisible or inactive colliders or anything simple like that.

When I first noticed bullets occasionally ignoring collisions, I figured it was the physics engine being unreliable and played around with how I did collision detection queries. No luck.

It seemed like the bounce was occurring not only at the exact rate of fire, but at the exact time firing occurred, so I investigated my weapon and module classes in extreme detail. No luck.

I even investigated my compute shader, geometry shader, and bullet rendering script. Swallowing the huge performance impact, I had Unity draw little blue debug lines on every single bullet all the time - those are the blue crosses visible above. No luck!

I was starting to go nuts and getting increasingly tempted to give up and resign myself to releasing a buggy game (okay I'm sure it'll be buggy anyway, but I should at least try to address the ones I do catch, right?)... but eventually I did figure it out. Notice that pink line? That's the debug line I have Unity draw to represent the new velocity a bullet is given when it impacts a ship - a line that only appears during the frame during which that impact occurs. The bullet bouncing off empty space is occurring exactly when, and only when, the next bullet actually strikes the ship!

It turns out that the second counter, Z, which tracks cumulative bullets, incremented after each bullet was fired and then was used as the start index for the compute buffer. Thus Z would begin at 0, I'd fire bullet 0, then Z would become 1. I'd fire bullet 10 and then Z would become 11. Thus when it was time to update the compute buffer, I'd say to start at index 11 rather than index 10 - every bullet would get assigned to the index just after its ID, and thus, as these IDs traveled back and forth during collision detection and eventually the compute shader compared the bullet IDs to the buffer indices, every time a bullet hit something the compute shader would go and edit the index matching that bullet's ID, i.e. the bullet just before - in other words, each bullet would bounce if the bullet just after it hit a ship. Yes that probably sounds a little confusing and it threw me for a loop (pun not planned but welcome) too.

Once I had that figured out, I went and re-did my counting system to be much more sensible. Now, R increments with every bullet, but Z does not - rather, Z stays put while the new bullets array is built and then increments by R afterward. Problem solved, though my head hurt.

Of course, after every bug there's another bug...

11 October 2020

ShipBasher Development Log 12: The GPU Bullet Collision Saga, Episode 2: There and Back Again, a Bullet's Tale

When I left off, I had just finished bragging about how I got information about bullets and ships to the compute shader so they could interact, and then I confessed that even with all the extra additions the bullets still couldn't have any effect on the ships in the actual game. Information about the bullets and ships was getting to the GPU and the compute shader, but no information was getting back from there to the CPU and the rest of the game's code; of most immediate importance was getting information to the physics engine.

I expanded the compute shader yet again to use a third compute buffer, this one representing bullets that had intersected a ship's collision sphere. This starts off empty and every time a bullet intersects such a sphere, it gets copied into the new buffer. The bullet manager is able to read this buffer every frame and thereby discover which bullets are inside a ship's radius and thus need proper collision checks. To start off I had Unity draw debug lines to represent each of these:

There are bunch of lines in this image, including the purple lines I have the script draw to vaguely indicate the bounding sphere of the target ship (the cylindrical object at center), but the focus for the moment is on the yellow lines. The blue crosses (which ironically I added later) are drawn by the "Point Cloud Renderer" script in charge of displaying the bullets. Every bullet that's inside the bounding sphere of the target ship is drawn with a yellow line running from its current position to its expected position in the next frame based on its velocity. Note that these are drawn, and collisions are handled, before the blue crosses are drawn by the rendering system, so the blue crosses generally line up with the forward ends of the yellow lines but sometimes are in different places as a result of a collision during this frame.

Now yes, for a very simple ship such as this target ship that only consists of one blocky module, it would be simpler to just send the collider to the compute shader and do all of the collision detection there, but in the finished game I expect ships to be composed of many modules and have odd shapes. Since the developers of PhysX (Unity's built-in physics engine) have already sunk a lot of time and expertise into doing precise and efficient collision detection, I intend to take advantage of the existing system here. Each yellow line not only depicts the bullet's projected trajectory, but traces the raycast used to query the physics engine for precise collision results. These not only include yes/no answers to whether the bullet struck something, but details about what it struck and how including surface normal vectors, the precise location of the impact, etc. In short, round-trip communication was now established and it had become possible to do proper game things like spawn explosion particles and apply damage to modules.

I also proceeded to take the "bouncing" placeholder code out of the compute shader and add a somewhat better bouncing function in the manager script. Bullets thus ricocheted off the ships' hulls and did so based on the surface normal vectors:

From left to right in the lower image: laser turret for reference; "old" turret without target leading (note how it misses the moving target); improved turret with instantiated prefab bullets; two different variations using the GPU Bullet System but without collision detection (orange and yellow - note how the bullets pass through the target with no effect); turret using GPU Bullet System and rough collisions based on bounding spheres (purple - note how the bullets bounce off in a scattered cloud); turret using latest collision detection features. The new system at this point caused bullets to reflect off the surface normals, but do so in a very "perfect" fashion so that they all came back in a nearly perfect single-file line.

After a few minor adjustments, such as allowing bullets to ricochet at reduced speeds (purple) and with some random variation in direction (cyan):

Things were looking pretty good, except that I kept occasionally noticing that a few bullets would still somehow manage to float effortlessly through the target ship as if it weren't there. I kept wanting to dismiss the problem as just a minor quirk, but looking objectively at the situation, when there were a lot of bullets flying around, the small fraction that didn't collide still made up a lot of bullets, too many to ignore.

I kept poking at this problem until it started to drive me crazy. I carefully examined debug lines such as those above, stepping through frame-by-frame in hopes of gleaning what made the non-colliding bullets special, and oooh, did I find quite a big problem lurking at the bottom of it all. Look forward to the depths of my despair frustration in the next entry.

09 October 2020

ShipBasher Development Log 11: The GPU Bullet Collision Saga, Episode 1: Spheres

I concluded the last log with a paragraph about how I planned to continue integrating my GPU Bullet System into ShipBasher by establishing round-trip communication between CPU-based physics code and a compute shader running on my GPU for bulk processing of bullets. As of now I've finally achieved this as well as uncovered and fixed some shocking bugs. The path here was quite a saga, so I shall recount it in parts.

Several years ago I started playing EVE Online and have gone back and forth between active play and long breaks ever since. I love many facets of the game and it's probably little surprise that it's one of the inspirations guiding my development of ShipBasher, both aesthetically and mechanically.

Because EVE Online runs on a single massive server cluster that has to handle tens of thousands of concurrent active players at times, there's no budget for careful, precise physics calculations when big swarms of ships start yeeting clouds of bullets at each other. As far as my research has led me to understand, the server instead abstracts away all the bullet motion and simply treats every ship as a sphere - a shape that can be fully defined with only four numbers, those being its position in each of three dimensions and its radius. With this knowledge, the server can get a fairly decent approximation of the ability of one ship in one place to damage a ship of a given size in some other place. Whenever a weapon fires, it crunches these numbers and a few others and determines what happens - all further detail is just visual effects.

All those little red, orange, and blue squares are indicators of player's ships. One can see the need for performance optimization.

I don't intend to approximate this roughly in ShipBasher, but I saw great potential in the idea of treating each ship as a simple sphere for coarse collision detection. I realized I could have every ship compute how big a sphere would fully enclose it, tell the GPU Bullet System what that value is, and thereby enable that system to easily differentiate between bullets near enough to a ship to be likely to touch it and bullets adrift in space unlikely to be touching anything. Presumably, most of the time the bullets about to hit things will be a minority of all the bullets that exist (since there's a lot more space not inside a ship than there is inside a ship in most circumstances), so if I can narrow those down and only do physics calculations for those, I can support much larger quantities of bullets without a much larger performance impact. The first step to doing this, of course, is to get those bounding spheres, which, like many things in programming, proved more complicated than it sounds.

Modules consist, in the game engine, of combinations of physical objects and visual objects, which don't necessarily (and usually don't) exactly match in shape or size. Most visual objects are "meshes," collections of 3D vertices connected with triangles, and most physical objects are "colliders," which are sets of equations that define geometric shapes and are invisible, but important for running simulations of solid objects. Calculating the exact radius of a collider is usually fairly simple, but requires a different strategy for every given type of collider that might exist in the finished game, and calculating the radius of a mesh is conceptually simple but very tedious. Fortunately, one thing that colliders and meshes have in common is that the engine uses axis-aligned bounding boxes as representations of their rough sizes. I could have used these instead of spheres, but it would have added slightly more work for the compute shader, and every bit of optimization counts in a system that might have to handle hundreds of thousands of bullets at once.

I investigated a few strategies for converting bounding boxes into approximate spheres and eventually settled on iterating through every collider and renderer (a visual object that has a bounding box - usually a mesh) attached to a given ship and, based on its relative position and the radius of its bounding box, incrementally calculating an approximate radius for the whole ship. This technique should be mathematically guaranteed to never give a result smaller than the "true" radius of the ship, but typically does overestimate slightly. Fortunately for my purposes, the smaller each individual module is relative to the ship, the more precise the overall calculation ends up being.

 I didn't actually need to include renderers at this point, but later on I expect to reuse the radius value in a few other parts of the game, and I want players to see a radius that is consistent with how big the ship actually appears to be.

With that part out of the way for now, I changed tack and started getting the GPU Bullet System ready to deal with spheres. I reprogrammed the compute shader to use a new buffer of spheres in addition to its existing buffer of bullets, and as a temporary debugging feature I rigged the bullet management script to generate some random spheres to feed into this new buffer alongside some random bullets (since the existing turrets are only able to target things like ships and modules, not imaginary spheres):

Not to be an overachiever, I didn't bother building a fancy visualization for the spheres, since they were temporary after all. I just had the engine draw some random debug lines based on the centers and radii of the spheres to give a vague sense of where their boundaries were. Also visible here are the debug lines and bullets from the old turrets, which I didn't bother disabling, but more importantly there are the white bullets spewing out in random directions. Note how most are radiating out from the origin, but a few are traveling other directions - these have struck a sphere and "bounced" (I put it in quotes because I didn't bother with actual reflection vector math and just made a crude approximation) off. Collision detection, hooray!

Next all I had to do was feed the compute shader with the real bounding spheres from the ships' actual positions and radii:

I had the wherewithal to turn off the starfield background at this point so the important things could be seen clearly. At left is the GPU Bullet System as it was before, flinging yellow dots into space to look pretty but do nothing else. At right is the new version. The target ship in the distance (as well as the testing ship in the foreground) has calculated its bounding sphere and added it to the sphere buffer as a 4D vector, in which the first three values are the position and the last value is the radius. Due to the way GPUs are built to deal with matrices and four-component colors (red, green, blue, and an "alpha" value typically used for opacity), this format is easy to implement and process.

The compute shader at this point had two tasks for each bullet: move it forward a bit based on its velocity if it is active, and go through all the bounding spheres to see if the bullet is inside one of them. This does mean that every compute thread is going to run through the full collection of all bounding spheres, as I haven't implemented any optimizations such as spatial partitioning, but considering that I don't expect there to be a huge number of ships active at once, I decided that a little inefficiency at this particular stage was a lesser evil than the extra complexity of some algorithm for picking and choosing which spheres to check. In fact, unless there actually are a huge number of ships, I suspect that my choice was in fact the optimal one here.

Once the compute shader had run, all of the active bullets had advanced forward and any bullets that touched a ship's bounding sphere had been detected. For the moment I simply had the GPU change their velocities to point directly away from the bounding sphere (that "bounce" I described above) so I could see that it was working, but all of the bullets were still confined to the realm of the GPU. They made it onto the screen, but no information about what happened to them made it back into the rest of my codebase, meaning that ships didn't know they'd been hit (nor did anything else, even the bullet manager script) and thus couldn't be damaged or otherwise affected. My next task (and the subject of the next entry to come) was thus to establish a line of communication from the compute shader back to the CPU and the scripts it was running.

26 September 2020

ShipBasher Development Log 10: PewPewPEWpewPewPEWpewPEWpewPewPewPEWpewPEWpewPew

Something I hope will be a draw for ShipBasher is the ability to marshal completely impractical ships that fire entirely unreasonable amounts of ammunition at each other, as I mentioned briefly in the last post.

In pursuit of this idea, I dusted off the GPU bullet system I had prototyped a while back and integrated it into the game over the course of one very late night. In so doing, I discovered that I'd more or less made my computer work with proverbially one hand tied behind its back.

See, like some kind of pro l33t h4x0r code sorcerer, I decided to use a compute shader for processing bullets. A persistent buffer of bullets is formed on the GPU, so that unlike in a normal shader, the results of computations made in one frame can carry over to the next frame - an essential feature when trying to use a GPU to simulate things moving over time.

But like a dumb idiot n00b, I was taking the buffer back from the GPU and sending it off to be made into a mesh object, making a redundant copy of it along the way, and then when it was time to render the frame having the mesh object get sent over to the GPU so that the poor thing could hold it in memory alongside the persistent buffer, essentially causing both my computations and memory usage to be doubled for no reason and, perhaps even worse, bottlenecking my performance by schlepping data back and forth every single frame. Basically the only useful thing the GPU cores were doing was moving each bullet forward a bit, which is such a trivial operation that I probably would get more performance out of skipping the compute shader business altogether and just calculating everything with the CPU like a normal person.

Of course once I noticed and apprehended the scale of this problem, I had to fix it immediately. I tinkered and fussed with my code until I had eliminated all the redundant data processing and made everything way more efficient. Unfortunately it didn't change much as far as the frame rate went, because it turns out that with my setup and its relatively weak GPU, my performance was limited by rendering speed anyway. Nevertheless it sure felt good to know my code was way less stupid than before.

I also made some tweaks to my weapons firing code so that turrets with extremely fast firing rates could fire multiple rounds per frame rather than being limited to one per frame as they had been before, and behold!

Yes I think I know what you're thinking.


In practice I doubt I'll include single turrets able to expend ammunition quite this fast (the last one is 20,000 rounds per second or 1.2 million rounds per minute) in the finished product, but the ability for many bullets to be released every frame by all the various turrets that I expect to be active at once is important.

Something else I hope gets noticed here is a big improvement I made to how the bullets get rendered. Now they stretch out along their velocity vectors, much like Unity's built-in Line Renderer, but unlike the built-in Line Renderer, they smoothly transition to point sprites if they are very far from the camera or are viewed from a very shallow angle to this vector, causing them to maintain a round, 3D appearance rather than give away their true nature as flat rectangles. It's not perfectly polished just yet, but I'm pretty proud of what I accomplished with it and think it makes for some nice screenshots (as you may have guessed).

The next problem to tackle is making these bullets actually do something. While it's amusing to watch fountains of bullets pour forth from my gun barrel, they simply float through space until their numbers come up in the pooling system and they start the cycle over again, never having any effect on the world, much like the test bullets not too long ago. This is a harder fish to fry, though: Unity's physics engine, PhysX, and all of the alternate physics engines available, do their processing using the CPU, using data sitting in RAM for all of the collidable objects and their locations - but this new bullet system operates on the GPU, which has its own memory that's separate from the RAM and is alien to the physics engine. I could write a whole collision detection algorithm in a compute shader, or I can find some inexpensive way to roughly predict collisions in there, hopefully for only a relatively small subset of bullets, and then extract some data about those back into the regular RAM so I can use it to tell the physics engine what's going on. It's just as complicated as it sounds, and thus the subject of at least one future blog post.

20 September 2020

ShipBasher Development Log 9: Damage Works Now Except It Doesn't But Now It Does Except It Doesn't But Now It Does

Two Three days after my previous post, I hit a milestone! It became possible to build the game, set it up elsewhere (a different folder or a different PC), and complete a "full" play cycle of loading ships; editing ships; saving ships; and pitting ships in battle with movement, weapons fire, module damage, explosions, and module and ship destruction!

Modules that become detached when their parent modules are destroyed now assign themselves to new debris "ships" (at least when everything works... as with every other part of the game, bugs have been occurring) so that they can properly participate in the physics simulation and in the battle, although in most cases, lacking any AI, they merely drift until something shoots and destroys them.

With all this accomplished, I was about to compile another build when I noticed something wrong with my test bullets: despite my claims that they did damage, they didn't! Lasers had been working fine the whole time, and still do last I checked, but the bullets kept crashing against modules without affecting their HP. I found that I had misinterpreted how Unity handles collision callbacks and was having the bullets shout information about their damage into empty space.
So I fixed it and made bullets do damage again, except they still didn't, and those lasers that were working fine didn't either. Problem with the new code? Nope.
See, my laser code roughly took the DPS, divided it by the frame rate, rounded that number to the nearest integer, and applied that much damage every frame. So my laser with supposedly 1 DPS did, each frame, a damage of 1 divided by somewhere between 20 and 60 (so something like 0.02), rounded to the nearest integer, which was basically always zero. Somehow it had seemed like it was working before, as with all the modules having only 1 HP, occasionally I guess there was a hiccup long enough for the damage to round up to 1 and destroy them - but once I started writing in reasonable HP values like 100, the lasers stopped working so well. Luckily that was a simple fix of setting the DPS to 100 instead. Yes, I have decided that the above failure mode is an acceptable consequence of my code working as designed and that I (and players) will simply have to set comfortably high damage values for lasers. I consider it a small price to pay for avoiding the Kraken by minimizing floating point operations.

The next addition was the beginnings of a system for relative file paths so that the game needn't exist in the exact directory I specify prior to building it. It's going to need improvement later as it was a quick fix not designed for much expandability, but for the moment it's sufficient for allowing me to share builds for eventual beta (alpha?) testing. Of course this doesn't have much of any visual consequences.

What did have visual (and other) consequences was when I decided to no longer have my Editable Data System be responsible for converting editable data between linked lists and arrays based on whether the game is in an editing or play situation. Rather it would always stick with linked lists for ease of editing, and other systems interacting with it would instead be responsible for gathering up whatever data they would need to access rapidly or frequently and then submitting it when done. This, as I feared, messed up a lot of other things, as it turned out that despite my imagined efforts at maintaining encapsulation, the system had still ended up coupled to a bunch of other things in the project. It took most of the day to undo the damage and I kept kicking myself for not backing up the project just before doing this (I have several backups going up to a mere few days earlier, but even more recent would have been safer). Fortunately, eventually it worked despite the very un-helpful debug messages I had made it give me:

Those time stamps aren't even part of the messages - they're an optional feature of Unity's debug console. I had literally built a system to spam the log with empty messages. Hooray!

With that nerve-wracking process out of the way, I was about to recompile the game again when I noticed something wrong with my test bullets... uh, again. It turned out I had misinterpreted how Unity handles collision callbacks, again, and was having the bullets shout information about their damage to objects entirely unequipped to handle what was going on. Hey, at least it was better than empty space this time.

So I fixed that and damage was (supposedly) working again, except that lasers were still way more useful than bullets due to one simple thing: my ships' turrets have terrible aim. They are able to precisely point themselves at their targets and fire with no problem at all, but things move in this game, so by the time the bullets get there, often the target has moved far enough that they miss. Thus I decided that my next order of business was to start incorporating the awesome target tracking system I had rigged up a while back in my test project:

I was actually quite proud of myself when I made this. The turret in the foreground accounts for the velocity of the sphere in the background and fires at a point ahead of it, calculated just right so that the bullets hit it when it gets there. It also makes use of another cool (if I may say so myself) system I had made even earlier, which was a GPU-based point cloud sort of thing that can render absolutely obscene numbers of bullets (or star sprites, as in the background of this blog at the time of posting this entry):

The second image had its colors adjusted to make it easier to see just how many were being displayed - every single one of those little dots in the distance is a bullet the turret has fired, and the engine is chugging along happily at a very high frame rate. This thing can actually handle a larger number of bullets than Unity can handle of mesh vertices (more than 65535) and will thus be a serious boon in a game where I imagine people will be having ships spew entirely unreasonable quantities of ammunition at each other.

Of course, this system was not compatible with the turret system I was using for my weapons right out of the box. I was going to have to move away from the existing (temporary) strategy of having the turrets aim themselves and toward an architecture wherein weapons intelligently aim their turrets based on what the player is trying to accomplish - basically a system for letting the player issue orders to the ship regarding where to fire, so I figured I may as well get started on that. Thus I began building a UI for selecting ships in play mode, selecting targets for them, and ordering them to fire on those targets. Putting the buttons there was simple, but then I had to add functionality, meaning I had to draft a new ship control script and upgrade the way weapons function so that they can match their targets to what their parent ship has targeted (I do still want them to be able to pick their own targets in certain situations).

While testing that out, I came to realize that it would help to have a target practice dummy in the form of a durable ship with lots of inertia. So I built one and then edited its file manually to give its modules especially high masses and unreasonably durable armor. I loaded it up in the game, and then I noticed something wrong with my test bullets. This time they were doing way too much damage because the armor wasn't doing its job! Time to debug some more...

I had mixed myself up on what the design was for my own game. See, I had made it so that damage could come in one of eight types and that armor would resist each of those types differently (except for the first type, which is "magic" and bypasses armor - it's intended for testing (and has served me well thus far in that area) and cases where I would want a special overpowered weapon such as in boss fights). Armor shrinks the incoming damage toward zero based on how close its resistance to that type is to one - so yes, a resistance of one would make a module invulnerable against a given damage type, but I intend to disallow players from giving modules that high a resistance without enabling cheats.

Except I momentarily deluded myself into thinking it was the armor value itself that would shrink the incoming damage like this, not the resistances, so when I gave the test dummy's modules an armor value of 0.99999, expecting them to be nigh invincible, and they were instead popping within a few seconds, I got really confused. As seen above, my efforts to figure this all out involved a lot of calls to Debug.DrawLine and Debug.DrawRay and temporarily having my modules spam the console with messages about what sorts of damage they were receiving. Sadly I didn't think to show it here, but I took some time a few days ago to rig up an editor window for my Editable Data System that shows all of the editable values attached to a given object, and it proved very helpful here in reassuring me that at least the editable data was being handled properly.

Hopefully all this rambling didn't seem too pointless or boring. In short, it's the tale of my increasingly complex game having many possible points of failure and the confusion and frustration (and eventual joy) I experienced in tracking down, analyzing, and rectifying these failures. There are probably a lot of possible lessons to glean from all this, but I suppose one of them is that if you keep up your efforts, building systems for anything from cool visual effects to debugging assistants, chances are it'll pay off later when they all come together. I look forward to showing off more of the player ship control UI and my upgraded weapon system in the next installment.

10 September 2020

ShipBasher Development Log 8: Vision

I figure it's about time I shared a detailed description of exactly what game I'm trying to make here. In short, ShipBasher is a real-time 3D sandbox, simulation, and strategy game about building custom spacecraft out of premade pieces (known as kitbashing, hence the name) and pitting them in battle against one another. I'll expound on each of these facets here in their own sections.

Main Menu 

The intended gameplay experience starts, as most games do, with the main menu. Originally this was a generic list of buttons to enter different environments in the game (i.e. settings page, credits, campaign mode, ship editor) but then I decided to take a bit of inspiration from Spore and have a big 3D galaxy occupying most of the screen, as I have mocked up here:

This is itself a menu in that each little circle represents a playable level. Part of each level's data file will be a position in the galaxy at which it appears. As I intend to allow players to create their own levels and place no limits on how many a player can have, it will be possible to fly the camera through this galaxy to explore different areas of it up close.

By selecting any of these circles, the player can open a preview of the level, which takes the form of a "wormhole" showing the level's background features and a window detailing properties such as the level's name and description.

Playing a Level 

Once a level is selected, or a fresh new one is created using the buttons on the side, it can then be played or edited. There will be separate UIs for playing a level and for editing it. This is a mockup of the play mode UI:

While playing a level, the player can select one or more ships to control. I plan to make it possible to restrict which ships are available for a player to control and which are "enemy" or "NPC" ships. For now clicking any module on a ship will select that module and the ship to which it is attached, and as seen here that module will be highlighted and the ship will have a ring drawn around it.

While a ship is being controlled, a menu will be visible (in this mockup it is at lower right) for issuing commands that affect that ship, such as initiating self destruct. Right-clicking a module on any other ship will open a menu (seen at upper left) for interactions between the selected ship and that other ship, such as attacking it.
The camera can be focused on any ship and rotated around it, but to keep track of objects not in the current field of view, there is a radar display at lower left with a slider to adjust its range.
Each ship may have a small readout next to it showing its current status.

Finally, a few large objects are visible in the background. The distant star and planet are visual effects only and won't affect gameplay, but the asteroid on the right is a physical obstacle players will need to accommodate. I may add levels in which asteroids need to be destroyed, or in which special environmental hazards from distant objects affect ships in the level - for example a pulsar that would damage ships with its radiation. These concepts have yet to be figured out in much detail for now.

Planned but not shown are options for pausing the level or returning to the main menu.

Editing a Level 

Instead of playing a level, the player can open a level for editing, or, in certain circumstances, the player can pause a level in progress and edit it. Editing a level involves a different UI:

As in play mode, any ship and any module can be selected. Different windows exist for editing these or for editing the level itself.

At lower left is a window for editing the properties of the level, such as its name, description, and location in the galaxy. Changing the level's location in the galaxy will alter the appearance of the background starfield, so that a level near the galactic core, for example, will be surrounded with a dense field of yellowish stars. Additional information may be shown such as how many total ships exist and a difficulty rating, which will likely be left to the players to determine but might be possible to calculate.
At upper left are buttons for adding objects to the level, e.g. ships, distant background objects such as stars or planets, or physical hazards such as asteroids. Clicking the button to add a ship will reveal options to either create a new ship (not shown in this image) or open a saved ship from a file and spawn it in front of the camera.
Once a ship exists in the level, it can be moved and rotated, and a window becomes visible for editing properties such as its name and description (seen here at lower center). Additional information such as its total mass and firepower is also intended to appear here. At the top of the ship editing window are buttons for tasks such as copying or removing a ship or for saving it to a file.

Any ship will need at least one module attached for it to function. Visible at lower right is a menu for adding modules to ships. When the player hovers over a module in this menu, a preview window appears, allowing the player to examine the properties of the module before loading it. Once a module has been attached, it can be moved and rotated using transform handles, as shown surrounding the module in space, and a window appears, shown here in the upper right, allowing properties such as its name and description to be edited. I may make it possible to restrict editing of certain properties in certain contexts, for example allowing the armor and damage power of a weapon to be changed but not the price (rather the price would be calculated based on how powerful the module is made via other edits). At the top of the module editing window is a set of buttons for tasks such as copying or removing modules or saving a customized module to a file.
At this time it is not planned to allow the scale of modules to be altered or for any custom 3D modeling or texturing to occur in the game.

Finally, at upper right are buttons for saving the current level, playing it, or returning to the main menu.

Other Features 

As seen here, ShipBasher uses a 3D environment with a third-person camera. Every object in the game is able to move in three dimensions, not restricted to a ground plane, grid, or global axes. The camera can be rotated omnidirectionally so that there is no universal "up" or "down" direction, as is the case in outer space in real life.

ShipBasher simulates in real-time, i.e. gameplay is not based on turns. It will be possible to pause the game, but time dilation, either to slow it down or speed it up, is not planned.

Being a sandbox and simulation game, ShipBasher has no central storyline, goals, or sequence of levels through which the player must progress. I intend to include a number of example ships and levels, and I may decide later to make it possible to restrict some levels until after other levels have been completed, but this is not planned at the moment.

A strategy element arises in how players will go about clearing each level that exists - which ships to include (if the option is available), what orders to give them, etc.

Players will be able, as described above, to create their own ships and levels, save these in files, and share them with other players. I have no plans to make this a multiplayer game, include any online functionality, or set up any hosting servers, so it will be up to individual players to send files to each other and import them into their own games.

Hopefully this clears up any mysteries surrounding what my goals for this game are. I'll be glad to address any questions I haven't answered so far.

Sorry this isn't a real post :C

I've entered graduate school and, as I expected, suddenly become far busier than I had been before, leaving no time to maintain my blog,...